ROYAL NAVY HARBOUR DEFENCES - HONG KONG
The Royal Navy installed a number of harbour
defences at Hong Kong at the outset of World War 2. By summer 1939 eight indicator loops had been laid
at the harbour entrance.
|
If you worked there or have any feedback please email me: |

My thanks to Bruce Rolph and Rob Weir for their help with these pages.
LINKS TO MY RELATED PAGES:
Indicator Loops - an overview (YouTube, 70 minutes)
Indicator Loops around the World (Home Page)
How an indicator loop works
INTRODUCTION
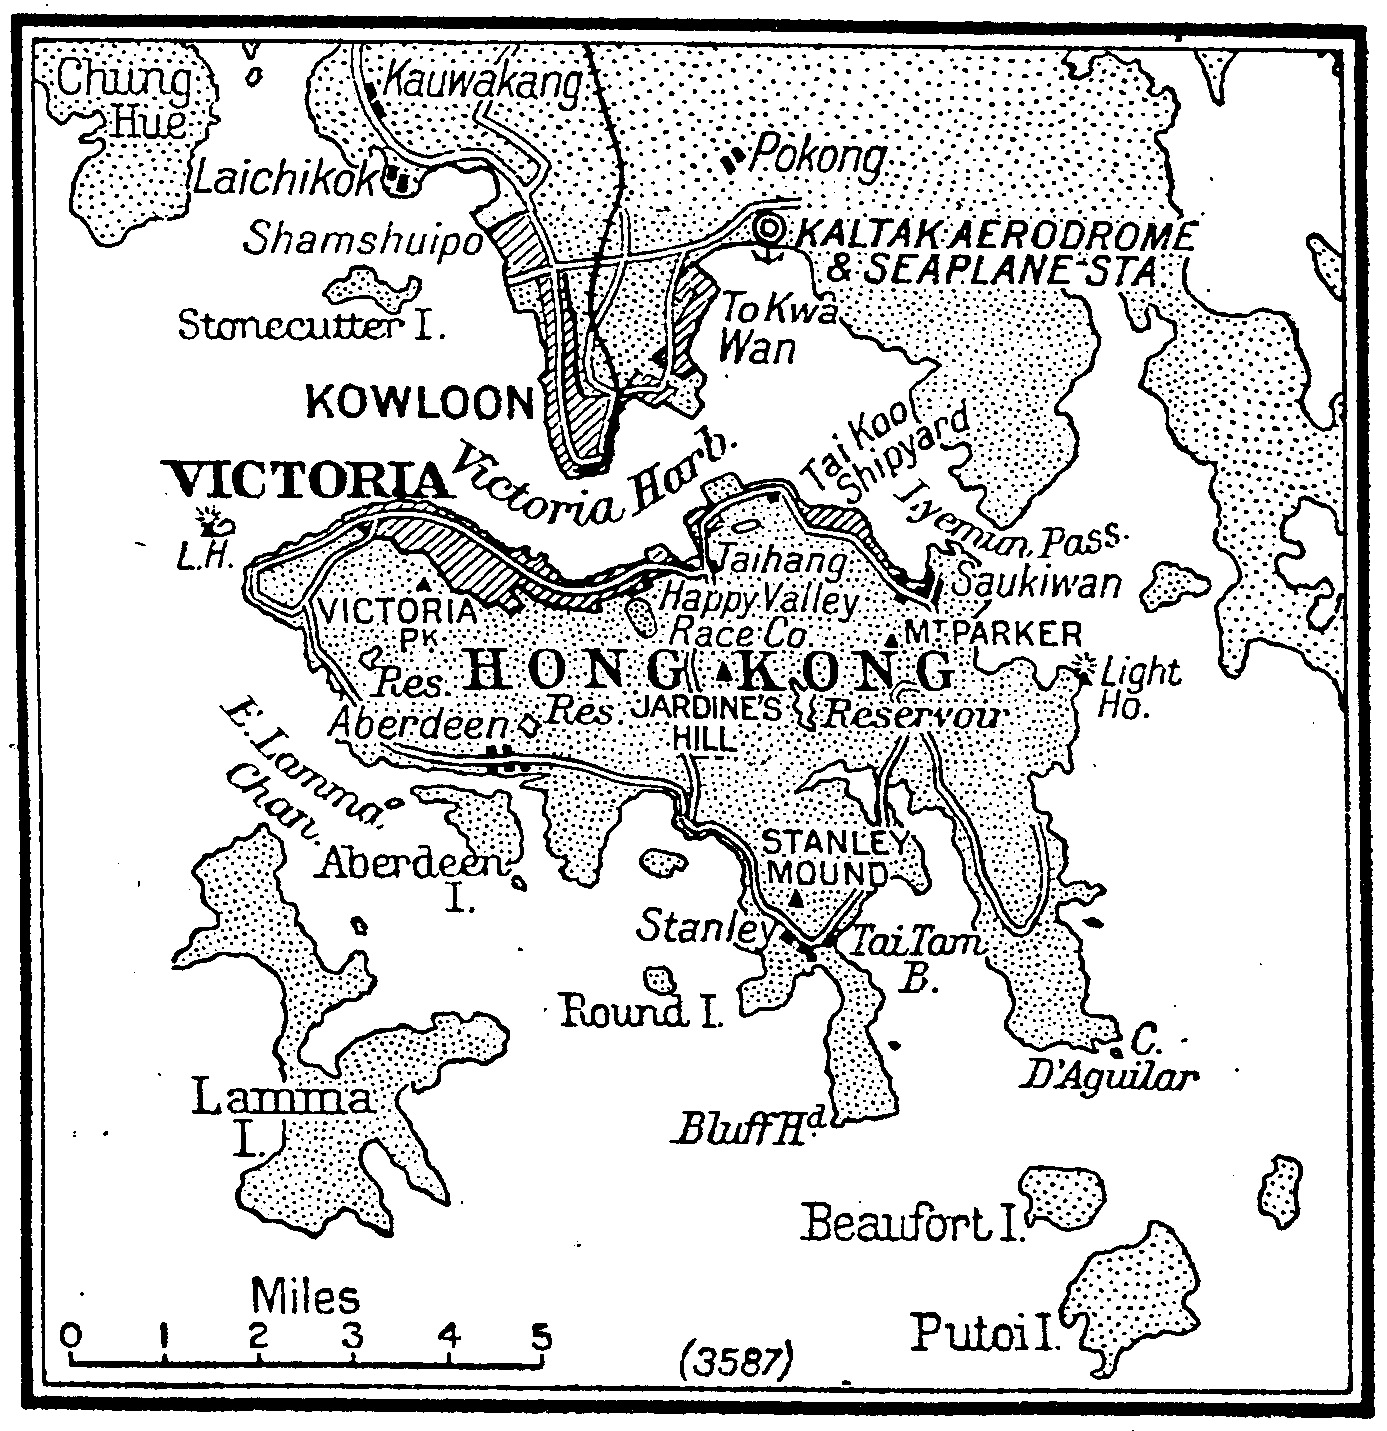
Hong Kong - with an area of 1042 km2 - is situated on a peninsula and series of islands on the south coast of China, to the east of the Pearl River Delta and bordered to the north by Guangdong province. It is separated from the city of Kowloon, on the mainland, by the mile-wide waters of Victoria Harbour. Great Britain acquired Hong Kong Island in 1842 and soon developed the island’s principal city, Victoria, into a major port serving mainland China. In addition to garrisoning the island with British and Indian troops, a number of coast defence batteries were constructed. With the acquisition in 1899 of the 368-square-mile New Territories on the mainland, the British were able to provide a buffer zone that protected Hong Kong Island from direct artillery attack from the mainland. During the 19th century, the Royal Navy developed a small naval base on Hong Kong Island.During the 1920s the British government was uncertain about being able to hold Hong Kong if attacked. The military were confident that they could hold the island against a seaborne raid, but the men and equipment necessary to defend against a landward attack was prohibitive. During the late 1930s, however, the British military became convinced they could defend Hong Kong from a landward attack. The plan they developed was to build a fortified stop line inland from the city of Kowloon. This fortified line, the Gin Drinkers Line, was built between 1936 and 1938 to hold off an attack until the Royal Navy arrived with relief. Unfortunately, the Gin Drinkers Line was never sufficiently garrisoned and was thus easily penetrated by the Japanese army on December 9, 1941. The Gin Drinkers Line took its name from Gin Drinkers Bay, the southern anchor of the fortified line.
 |
| Controlled mines were installed in East Lamma Channel and Tathong Channel and the eight indicator loops that guarded them were in a big arc across the three channels (see map later). |
By 1931 indicator loops had proved
themselves with friendly ships but performance in war was uncertain.
Although it was the British Admiralty's clear intention to use indicator
loops extensively for the defence of harbours, and it was their policy
to lay them in peacetime due to the time required for such operations,
no large laying program was even contemplated.1 British defence planners decided in 1933 that a permanent party
of officers of officers and (pensioner) men be formed at HMS Vernon for
controlled mining work. Controlled mines differ from contact and magnetic mines
in that they are detonated from a shore station by underwater cable after a ship
is detected by an indicator loop. The party of 15 officers and 164 seamen came
into being in 1934 and were ready to be sent wherever needed for defensive
mining and indicator loop installation, maintenance and watchkeeping. Part of
the British defence of Hong Kong island was laying mine fields in the waters
around the island. In 1935, the British established a mine depot at Hong Kong
staffed by civilians under the director of armament supply. The Royal Navy
stationed S-class destroyers HMS Scout, HMS Tenedos, HMS Thanet, and HMS Thracian at Hong Kong. These ships could be converted to mine layers by removing
their torpedo tubes and aft main gun.
With the outbreak of war in Europe in
September 1939, the British government ordered the harbour defence of
Hong Kong to war status. At the same time, they ordered Scout and Tenedos to Singapore, and Thanet and Thracian were
to be converted into minelayers. After the mines were laid, the
destroyers were reconverted to the destroyer role. The two destroyers
were aided by the conversion of two ferry boats, SS Mao Lee and
SS Mao Yeung, to mine layers and the arrival of the coastal
minelayer HMS Redstart.
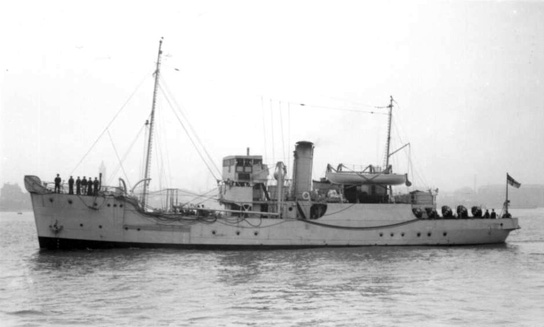 |
HMS Redstart |
Documentation on Hong Kong is sparse, and it is frustrating to find reference to something, but not be able to follow because associated documentation is not available. This apparently is a result of the place being overrun by troops, coupled with the Indian Independence - where a lot of British documentation was destroyed in the riots. The following notes were made by Rob Weir from the original Admiralty documents in The National Archives, London.
WAR DIARIES
ADM 199/374 "China, Malaya and Hong Kong Stations: War Diaries".
Reports on escaped mines, loops and A/S boom gate openings. No description of where they were other than: North Lantau minefield, West Lamma minefield etc. Loops listed as M13 East Lamma Channel, M21 Tathong Channel, M20 Tathong Channel West Lamma Minefield. In reference to Boom: comments on wear on jackstays and stretcher chains. No. 1 and 2 Trots have been subjected to heavy wear and tear in confused seas that run close off Cape Collinson. Suggests boom be resited 7 cables NW of present and between rocks 1½ cables north of Kei Pei Ha Point and Junk Island. (Approved). Junk hit a mine off Pillar Point. M13 loop (East Lamma Channel) fouled. M21, M18 (Tathong Channel), M15, 16 and 17 mentioned. New boom moored (June 1940) between Ma Tong and Junk Island. Large junk blown up on West Lamma minefield. M14 mentioned, M2 mentioned, M16 and M29.
Separate notes, various sources: Mine Control Officer at Chung Am Kok. Indicator Loop Hut at Tytam (Tai Tam). Sketch showing a Mine Watching Station at the end of Brick Hill (Nam Long Shan), west of the AA site. 1936 letter recommends approved scale of mines in Hong Kong (1360 mines) should be increased to 2017 mines. A/S protection across the Eastern Entrance. Antisubmarine Boom from Hak Kok Tau and Jan Chau in Tathong Channel leaving a small boat passage between Jan Chau and the mainland which is 3 foot deep at low water. Boom gate in the area between Pak Sha Wan Battery and Collinson Battery.
ADM 116/3490 about 1934.
Letter from Governor L Peel, 8th Jan 1934 refers in one paragraph to:
It has been suggested that I draw attention to the lack of minefield defences
which continues in spite of the fact that these were expressly recommended by
the Naval Staff in 1928 in a memorandum entitled "Hong Kong Significance and
Local Naval Defences Recommended".
Letter from Naval Commander in Chief, China Station, to Governor Peel in
response. (dated 15 Jan 1934).
Para 6. .... I sent a telegram to the Admiralty asking for 1500 contact mines to
be sent out .....
Para 7. Their lordships have, however, since informed me that after giving the
matter their earnest consideration, they have decided not to send the mines
until storage is available for them on Stonecutters Island........
1935 Defence Plan.
A review of this plan by Admiral Dreyer points out that whilst paragraph 83 calls for
laying minefields, at present there are only 180 mines in HK although it has
been recommended that 1318 mines be laid.
Later letter: 24 hours to lay Indicator Net. 13 days to lay Anti Sub Boom. Work
can only be done in daylight hours.
ADM 116/9865.
Review dated 18th July 1939.
1250 contact mines and 480 controlled mines now held in HK.
Reply to a further letter: It would take about a week to lay the independent
minefields and three weeks for the controlled minefields.
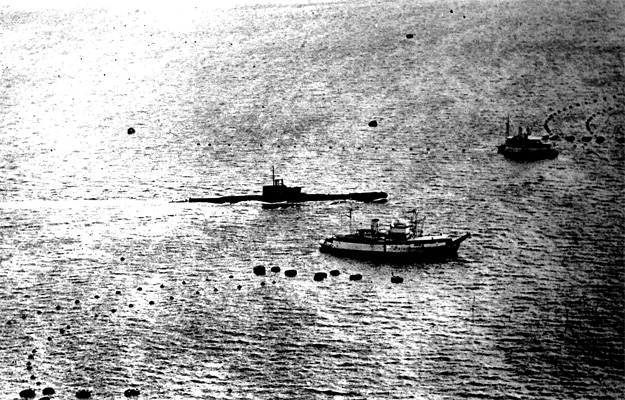 |
The submarine boom across the
main (Tathong) channel into Hong Kong harbour is being opened by two boom
defence vessels to allow a surfaced British submarine through to
its patrol area - 27th February 1940.
All other possible channels were closed to navigation and were
heavily protected. |
In June 1940, because of growing concern about the
intentions of the Japanese forces then occupying much of China, including the
part across the border of the Hong Kong leasehold, the evacuation was
ordered of some 1500 non-essential women and children, excepting single and
childless married women who were doing special jobs.
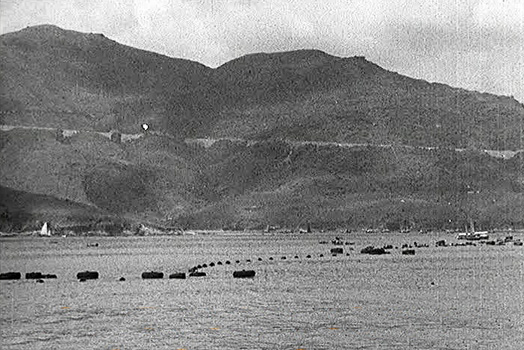 |
Boom nets across Tathong Channel looking towards the eastern end of Hong Kong, east of Quarry Bay (where Tai Koo Docks are). Photo taken from passenger ship "Empress of Japan" which departed from the Tai Koo Docks on 29th June 1940 during the British-civilian evacuation of Hong Kong. |
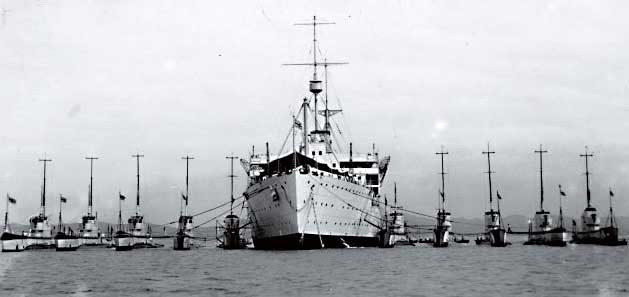 |
The Medway was the first large submarine depot ship to be designed as such and built for the Royal Navy. She was launched at Barrow by Vickers Armstrong on 19th July 1928 and commissioned at Devonport on 6th July 1929. She sailed for Hong Kong in the 1930s with six O-class submarines to replace the Titania and her L-class boats, remaining on the China Station serving the 4th Submarine Flotilla until April 1940, when she was sent to the Mediterranean. On 30th June 1942 she was torpedoed by U372 off Alexandria whilst on passage to Haifa and Beirut. |
REPORTS ON NAVAL DEFENCES - DECEMBER 1940 TO SEPTEMBER 1941
The following is a summary of harbour defences during Japanese hostilities (prepared from Admiralty documents by Rob Weir):
ADM 199/1488.
January 1941.
10th. SS Benlede arrived with 200 Mk XIVB mines.
13th. SS Glenstrae arrived with 300 Mk XIVB mines.
23rd. 138 Mk XIVB mines laid in two lines close to the south end of West Lamma
Minefield as a first reinforcement.
26th. One L mine adrift from Loop 27. During the month 12 mines broke adrift
from West Lamma Minefield, 3 broke adrift from North Lantau Minefield. Recovered
10, Exploded ashore 2, Lost - Sunk by rifle 2. Total 14 Boom Defence. The gate
was worked 217 times during the month.
19-21 Jan. A clearing sweep was carried out to S and SW of Lamma Minefield
preparatory to the two lines being laid. 4 Junks were arrested for anchoring in
the Tathong Controlled Minefield during the month.
February 1941.
10th. The North Shore Harbour boom on the HK side, Eastern section, was
commenced.
11th. Second reinforcement to the Southward of the West Lamma Minefield, 140 Mk
14 mines being laid. During the month: The North Shore Anti-Boat Boom was rigged
from the North East corner of the dockyard to a position about 1 cable West of
Kellett Island. 7 mines broke away from West Lamma Minefield 4 mines broke
adrift from North Lantau Minefield. Recovered 10, Exploded ashore 1. Total 11
Boom Service: the gate was worked 209 times during the month. The gate vessels moorings were adjusted so that a double line gate could be worked. 10 junks and a steamboat arrested for anchoring in controlled minefields. Junk No. 14 blown up (5 missing) while hauling in her trawl about one mile westward of Long Kau Tang village. The position was about 2 miles from the nearest line of mines in the Lantau Minefield. 11 mines adrift from West Lamma Minefield, 2 from North Lantau Minefield. 10 recovered, 2 exploded, 1 lost. One 'L' mine adrift from Tathong Channel Loop. Drifted ashore at Sheko and was recovered. Boom gate was worked 223 times this month. No. 6 Indicator Loop, Inner Leg severed by tug towing target for Military firing.
April 1941.
8 mines adrift from West Lamma Minefield, 8 from North Lantau Minefield.
Recovered 13, Exploded 2, Lost 1. Guard Loop No. 1 which had been damaged by a
towing hawser was repaired. Tail of M28 Loop was under-run, repaired and buoyed.
Loop M13 was recovered. One control mine from M5 adrift in West Lamma Channel.
Gate worked 197 times this month.
May 1941.
Mine Loop M13 was relaid in the West Lamma Channel. Mine Loop M12 was weighed -
later relaid Lamma Channel. Mine Loop M5 was weighed. 13 mines of Mine Loop M6
were weighed, M7 was then fouled, 2 mines from M7 being recovered the next day.
Mine Loop M5 was laid Lamma Channel. Mine Loop M7 was weighed, still foul of
remains of M6, 31 out of 32 mines being recovered. These loops were fouled by a
heavy tow and were fouled of each other when picked up. Mine Loop M28 was laid
in the entrance of Tathong Channel. 10 mines adrift West Lamma, 11 North Lamma.
All recovered to Stonecutters armament depot. Gate worked 205 times this month.
June 1941.
Typhoon on 30th. No 9 Signal. It is estimated that about 40 to 50 contact mines
broke adrift during the typhoon which included 5 that were heard to explode. 27
mines adrift, 13 Lamma, 14 Lantau. 25 recovered, 1 exploded ashore, 1 sunk by
rifle. Relaid M6 in Lamma Channel. Relaid M7 in Lamma Channel. Repaired Guard
Loop G1 Lamma Channel. Gate worked 217 times.
July 1941.
Typhoon - above - went North and inland.
August 1941.
Report missing.
September 1941.
No 9 signal hoisted 16th. [ No 9 signal, under the present system, means the
typhoon is basically going to pass overhead ]. 28 mines adrift, 15 North
Lantau, 11 West Lamma. 26 recovered, 2 exploded ashore. Laid M25 loop. Weighed
M27 loop. Laid M26 loop. Laid M29 loop. All the mine loops, with the exception
of M1, being laid in the Tathong Channel. Gate worked 222 times. Boom damaged by
typhoon, max 109 mph recorded.
On September 15th, 1941, the Admiralty issued instructions for the destruction of indicator loops and associated equipment. It read:
MOST SECRET. HONG KONG NAVAL EMERGENCY INSTRUCTIONS SECTION IV 43. DESTRUCTION OF FIXED NAVAL STATION 1. The A/S Fixed Defence System and all secret information in connection therewith is to be denied to the enemy at all costs. 2. With this object, and if it appears likely that the part of the Island containing the Fixed Defence Station can no longer be held by our Military forces, the order to demolish will be issued by the Commodore at Fortress Headquarters. The Fort A/S Officer, if available, will proceed to supervise the work of destruction. 3. Action to be taken on receipt of the order to demolish:- (a) Any attempt by the enemy or by fifth columnists to frustrate the demolition is to be resisted. (b) Tail cables are to be cut where they enter the tunnel under the roadway, and also in the water at as great a depth as possible. The lengths of cable thus removed are to be placed inside the wooden huts. (c) Oil and water are to be removed from petrol generators, which are to be run at full throttle with the intention that they should seize up. (d) All confidential books, records, charts and all papers containing information in connection with the loops are to be destroyed by fire. NOTE: This applies not only to those in the Station but also to those held elsewhere. (e) All Integrators, L.I.S.A. Transformers, L.I.S.A. Amplifiers, Balancing and Adjusting Boxes, and Recorder are to be destroyed with hammers, crowbars etc. (see also paragraph 4 below). (f) Drums of petrol are to be opened with their contents poured over the wooden huts. (g) Two depth charges are to be primed, fitted with Bickford’s safety fuse, and placed ready for firing in the Instrument Room and Generating Room. These are to be fired when the personnel are clear. NOTE: Depth charges, primers and a length of fuse are to be kept at the station for this purpose. 4. If time is available the Integrators may be removed to Aberdeen Dockyard and buried in a safe position known only to the Officers of the Station. Before doing this they are to be clamped, shipping strips added, and packed in their transport cases. They will thus be saved for future use when the area is recaptured by our own forces. 15th September, 1941. |
As Japanese troops moved against the New Territories, on December 9, 1941, Thracian was ordered to lay a minefield off of Tolo Harbour but was recalled before she could start laying and was instead told to lay the mines in Kap Shui Mun entrance. She accomplished this mission on December 10, 1941, the last mines laid by the Royal Navy in the defence of Hong Kong. On the 9 December 1941 the North Shore A/B Boom was partly laid. The following map shows the additional contact minefields laid from October to December 1941. The four additional contact minefields (to be set 6 feet below the surface at LWOST (Low Water of Ordinary Spring Tide)) were as follows:
(I) Tolo Channel.
Three lines of mines. Distance apart of mines, 150 feet. Distance apart of lines, 200 feet (60 m). Total 81 mines. The outer line will be laid across the channel on a bearing of approximately 329° from a point 234°, 9.2 cables (1.7 km) from Gruff Head. Mines in different lines will as far as possible be staggered. A narrow in-shore channel inside the 5-fathom line on the south shore will be marked by dan buoys from Whitehead to Gruff Head for passage of junks and gunboats by day.
 |
The planned Tolo Channel minefield. Thracian steamed for the area on 9th December 1941 but was urgently recalled before she could start laying and was instead told to lay the mines in Kap Shui Mun entrance . |
(II) Entrance to Port Shelter
Two lines of mines between Trio Island and Collinson Head, Bluff Island. Mines
spaced 200 feet apart. Distance between lines, 200 feet. Total 96.
(III) Western Approaches
(a) Two lines of mines laid 150 feet apart across Sulphur Channel. Distance
between lines, 200 feet. Total 21.
(b) One line of mines laid 150 feet apart from Green Island to Kau I Chau and
Kau I Chau to Peang Chau. Total 120.
(IV) East Lamma Channel
A single line of mines laid 150 feet apart between Wong Chu Kuk, Lamma Island
and Ngau Chau (Round Island). Total 52.
THE FINAL LAYOUT OF MINEFIELDS AND INDICATOR LOOP DEFENCES The final layout of all contact and controlled minefields, indicator loops and the antisubmarine book is shown on the following map dated 1 July 1941:
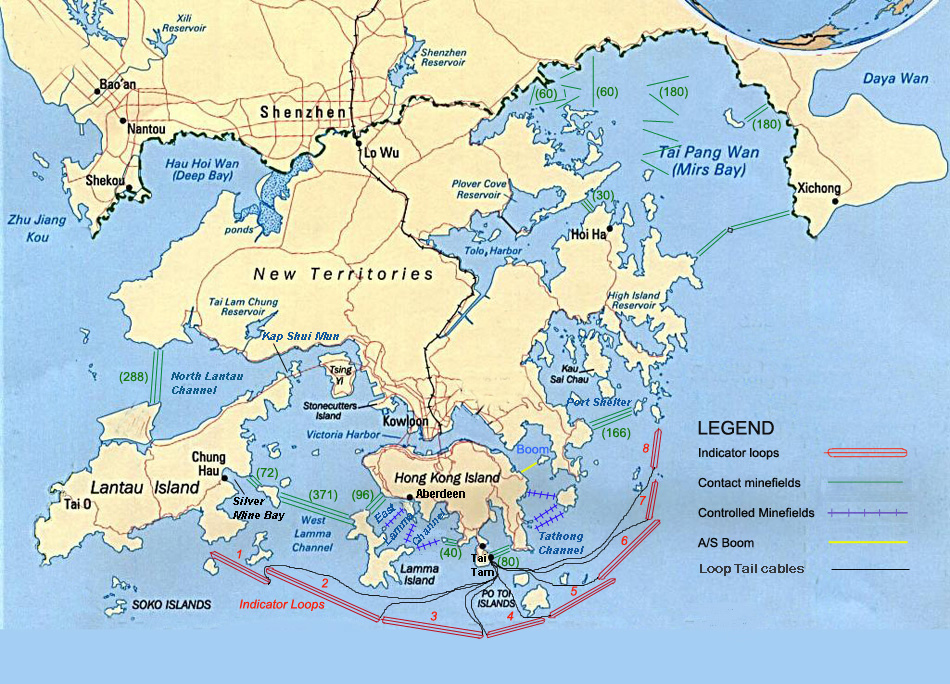 |
Location of the main minefields, indicator loops and booms actually laid and in operation - according to Admiralty documents. The map accompanied a telegram to the Admiralty (03392/19 Dec1941) "Immediate. Controlled Minefield fired but 4 loops misfired, both control stations and fixed defence stations attacked". |
However, it was to no avail: on 19 December 1941 the A/S Fixed Defences Stations were blown up at 1100 hours (11am). The controlled mine loops were blown at 1145 hours, 25 out of 29 loops functioning correctly. The controlled mine stations at Lamma and Sheko destroyed about noon. Thracian's end came on the night of December 15, 1941, when she ran aground in a sea battle with Japanese shipping. With repair impossible, she was disarmed and her guns and men went ashore to defend Hong Kong. Source: ADM 199/1286 "Hong Kong: siege, surrender and occupation" (courtesy of Rob Weir).
ADM 199/1287 (WAR DIARY - HONG KONG)
December 1941.
8-10th. The western part of the A/B Boom had been rigged the
previous week from Belchers Bay to No. 2 Buoy. The rigging of the rest of the
boom was not immediately proceeded with, as it could have interfered with the
Harbour traffic.
10-11th. I regret to report that the A/S Boom was not destroyed. [Referring to evacuation of ships from Tamar area to Aberdeen Dockyard].
18-19th. The controlled minefields were blown up, the Instruments
wrecked, and the Mine Control Stations burnt. The PWSS [Port War Signal Station] at D'Aguilar was
also wrecked. Staff of MC's and PWSS withdrew to Stanley.
 |
 |
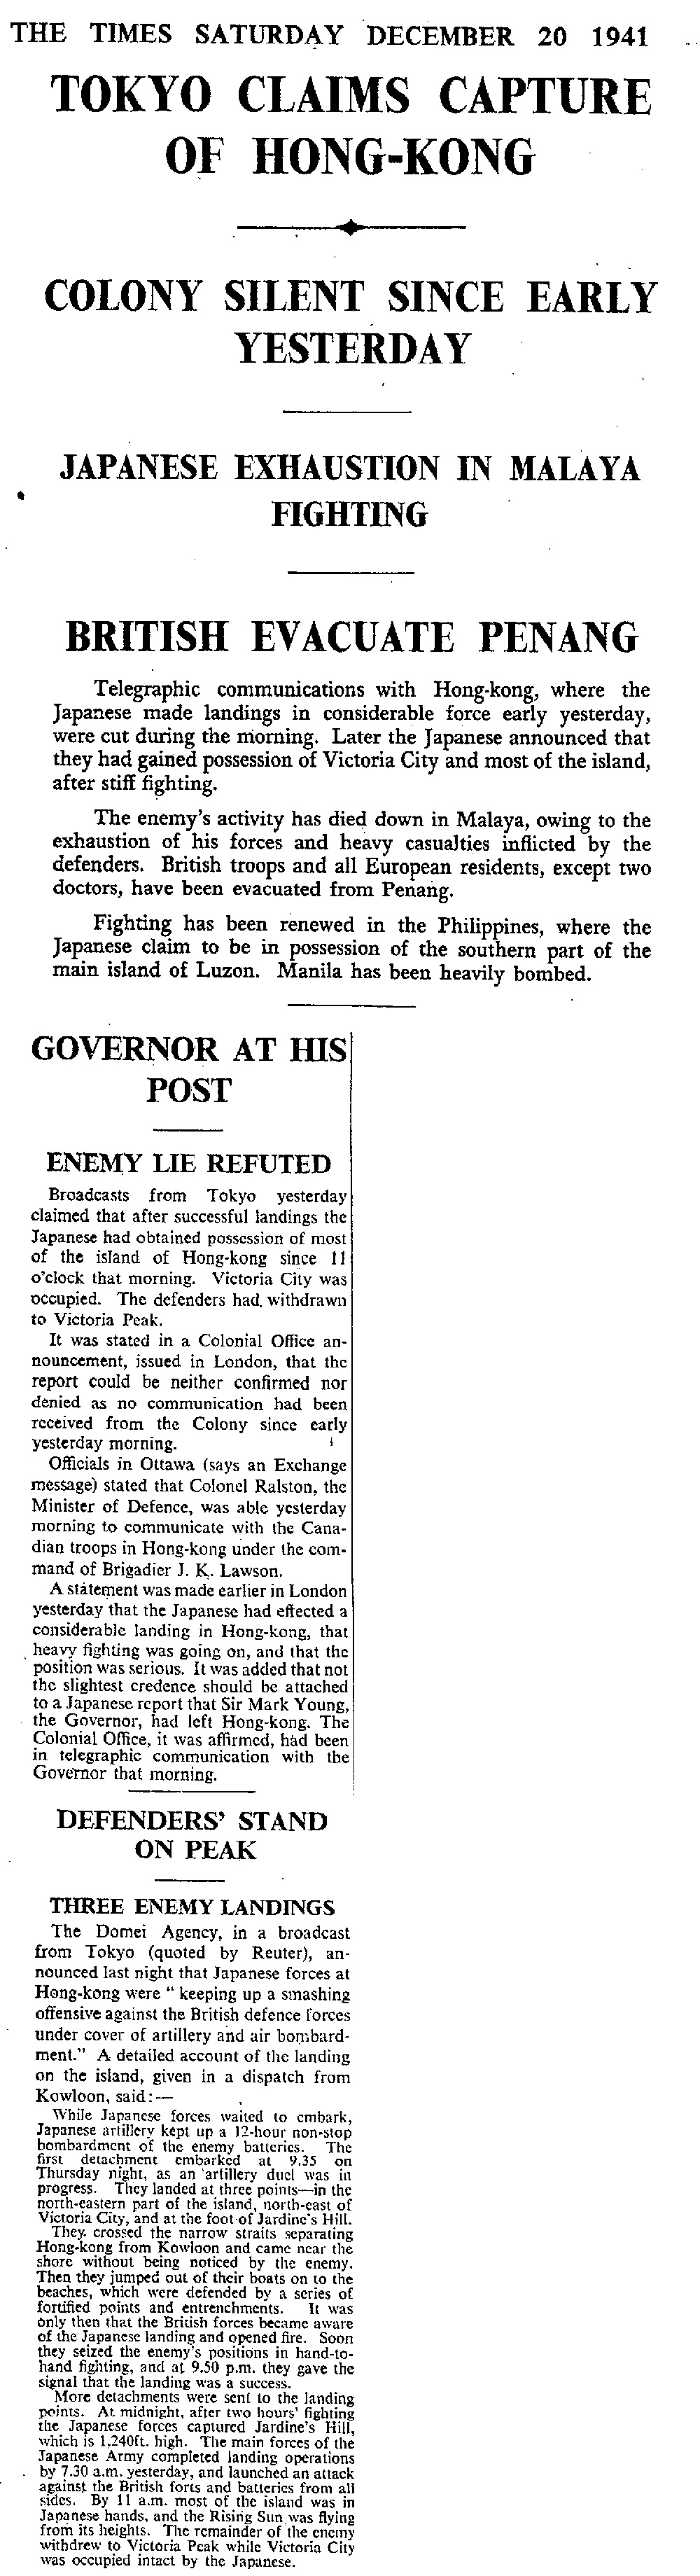
The Times (London) newspaper had been reporting daily on the Japanese thrust towards Hong Kong. This was the last report written before Hong Kong fell. Click here to see the full article. |
The Times of December 20 published the map shown above. Tathong Channel is on the right. Click here to see an enlargement. |
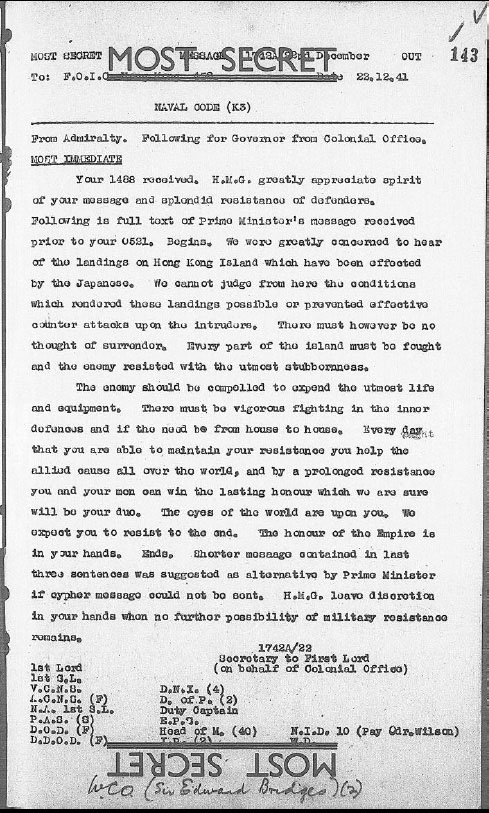
Nevertheless the First Lord of the Admiralty pressed the Governor of Hong Kong, Sir Mark Young, to fight on. Click here to see his belated Top Secret message issued on 22nd December 1941.
As for the shipping in the harbour - Thracian's crew took heavy casualties, and the survivors surrendered with Hong Kong on December 25, 1941. Thracian's hull had been scuttled but was salvaged by the Japanese in 1942 and became the Japanese Patrol Boat 101. She would survive the war, be returned to the Royal Navy, and then be sold for scrap. HMS Redstart was scuttled at Hong Kong on December 19, 1941 just a few days after Thracian's demise. As for Hong Kong's minefields, there is no record of them sinking any ships, but it is assumed that one or more local coastal or harbour craft came to grief there. It is also unclear whether the controlled minefields were exploded by their British operators before Hong Kong surrendered. This is most likely to have been the case. The Japanese did, however, incorporate the British contact minefields into their own defense of Hong Kong. When the Japanese surrendered Hong Kong to the Royal Navy on September 15, 1945, these contact minefields still defended Hong Kong Harbour and were then swept by the Royal Navy during the last quarter of 1945.
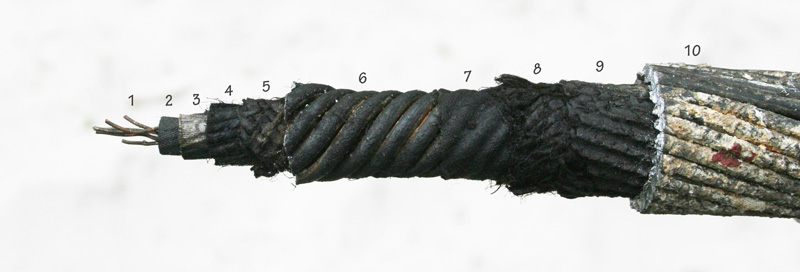 |
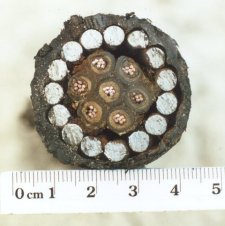
ADMIRALTY PATTERN 1989 INDICATOR LOOP CABLE. This is the type of cable that actually detected the crossings in WW2. It was made principally by W.T. Henley's Telegraph Works Company at Holborn Viaduct, London or by Siemens, London. The '1989' cable consists of a single core of seven strands of 0.029" tinned copper wire, windings of pure lead wire and armoured with lead coated steel wire. A full description may be found at my cablemakers webpage. |
 |
 |
ADMIRALTY PATTERN 660 INDICATOR LOOP TAIL CABLE. This is a 7--core armoured cable. The 7 cores were each insulated with india-rubber and wound in silk and separated by jute beddings. This was wrapped in more silk and tarred jute braid and protected by 15 steel armour wires (30 mm diameter) and two layers of tarred hemp braid wound in opposite directions. |
|
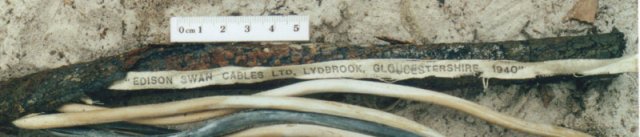 |
ADMIRALTY PATTERN 7048 EDISON SWAN INDICATOR LOOP TAIL CABLE. This is a 4 core, 7 strand made by Edison Swan Cables Ltd, Lydbrook, Gloucestershire in 1940 for their parent company Siemens Electric Lamps and Supplies Ltd (38 Upper Thames Street, London). The details on the tape in this sample from an Australian loop station can still be seen quite clearly after all these years on the beach. This cable has 3 cores in white rubber and one in black rubber which are laid up together with centre divider of black rubber, square in section. The cores are insulated with a rubber sheath and armoured with 20 galvanised steel wires, finally braided with hemp yarns and compounded with preservative. Weight per mile in air: 3.1 tons. The cost was about UK£144 per 1000 yards for this type of cable in 1939. |
HONG KONG ANTI-SMUGGLING BARRIER
In 1992 the Marine Police installed an anti-speedboat barrier across Tolo Channel as one of their initiatives to prevent cross-border (China/HK) smuggling. The barrier it turns out was placed in the exact spot that the indicator loops were laid.
Les Bird sent me a couple of photos of the current Tolo Channel anti-speedboat barrier. He served in the Marine Police in HK from 1976 to 1997. Les said "[the barrier] has proved effective since we put it in in 1992. The barrier is stretched across Tolo Channel in a very similar position to the 1941 barrier. It starts at Fung Wong Wat on the north shore and crosses directly southwards to the opposite side. It's length is exactly one mile. The 'gate', for legitimate access, is positioned in the middle and is manned by a Marine Police platform, which is supported by a police patrol launch."
 |
| The Hong Kong Marine Police Operating Base positioned at 'the gate' access position of the Tolo Channel anti-smuggling barrier. (Les Bird) |
 |
| Hong Kong Marine Department mooring buoys (in red), anchored to the sea bed, are positioned in a line across Tolo Channel. Between each buoy is a series of horizontally positioned can buoys (painted blue) lashed together to form the main barrier. (Les Bird) |
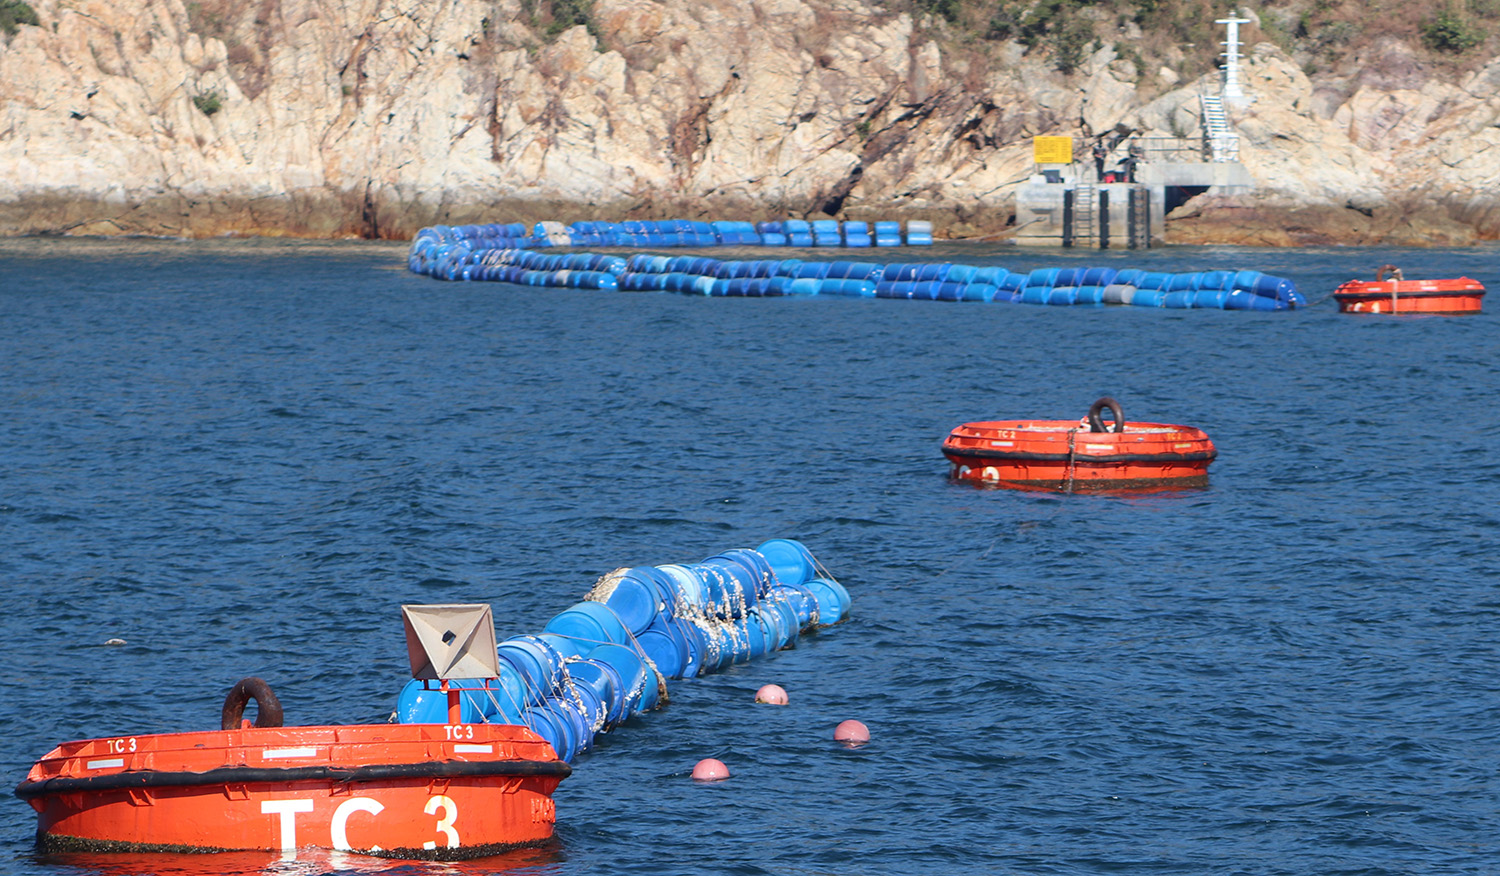 |
| Mooring buoys and can buoys as part of the main barrier. (Les Bird) |
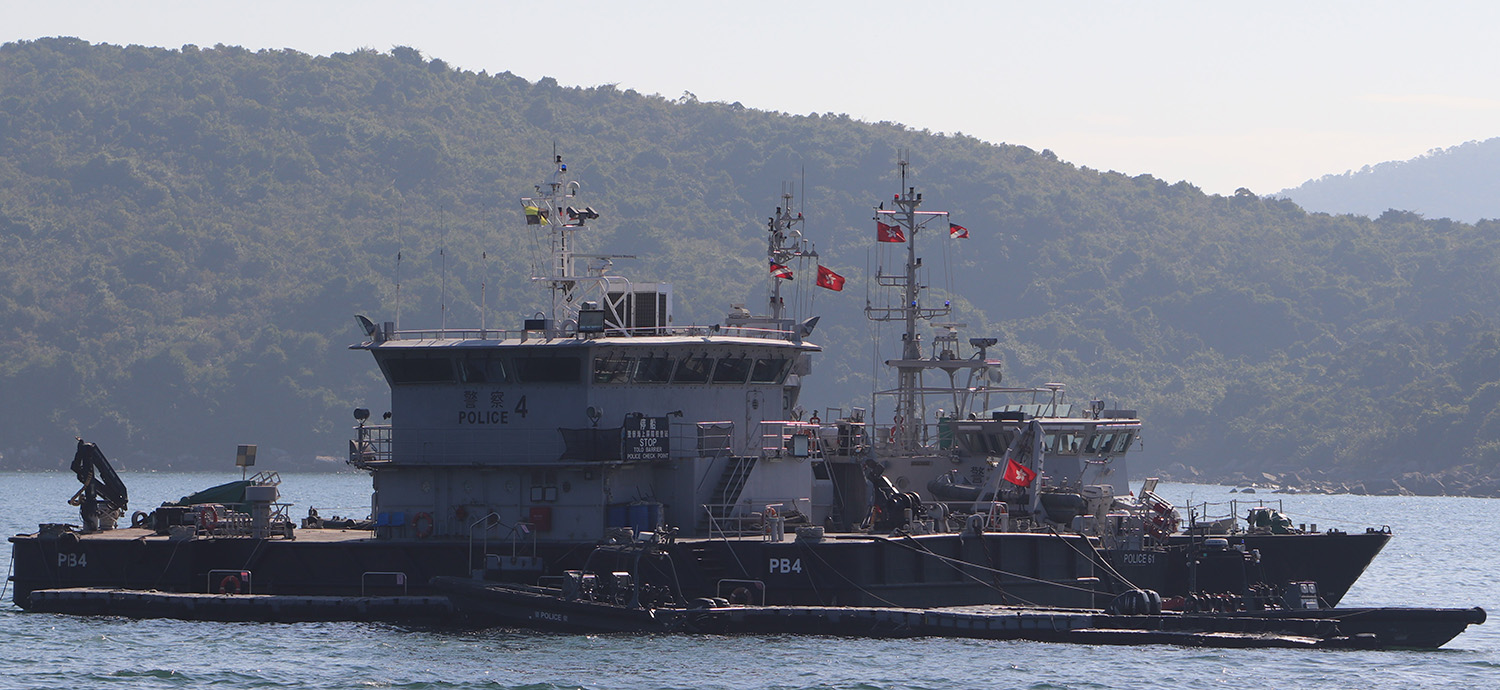 |
| A Marine Police patrol launch and two fast pursuit craft alongside the operating base. These vessels are deployed to direct and check craft requesting passage along the Tolo Channel. (Les Bird) |
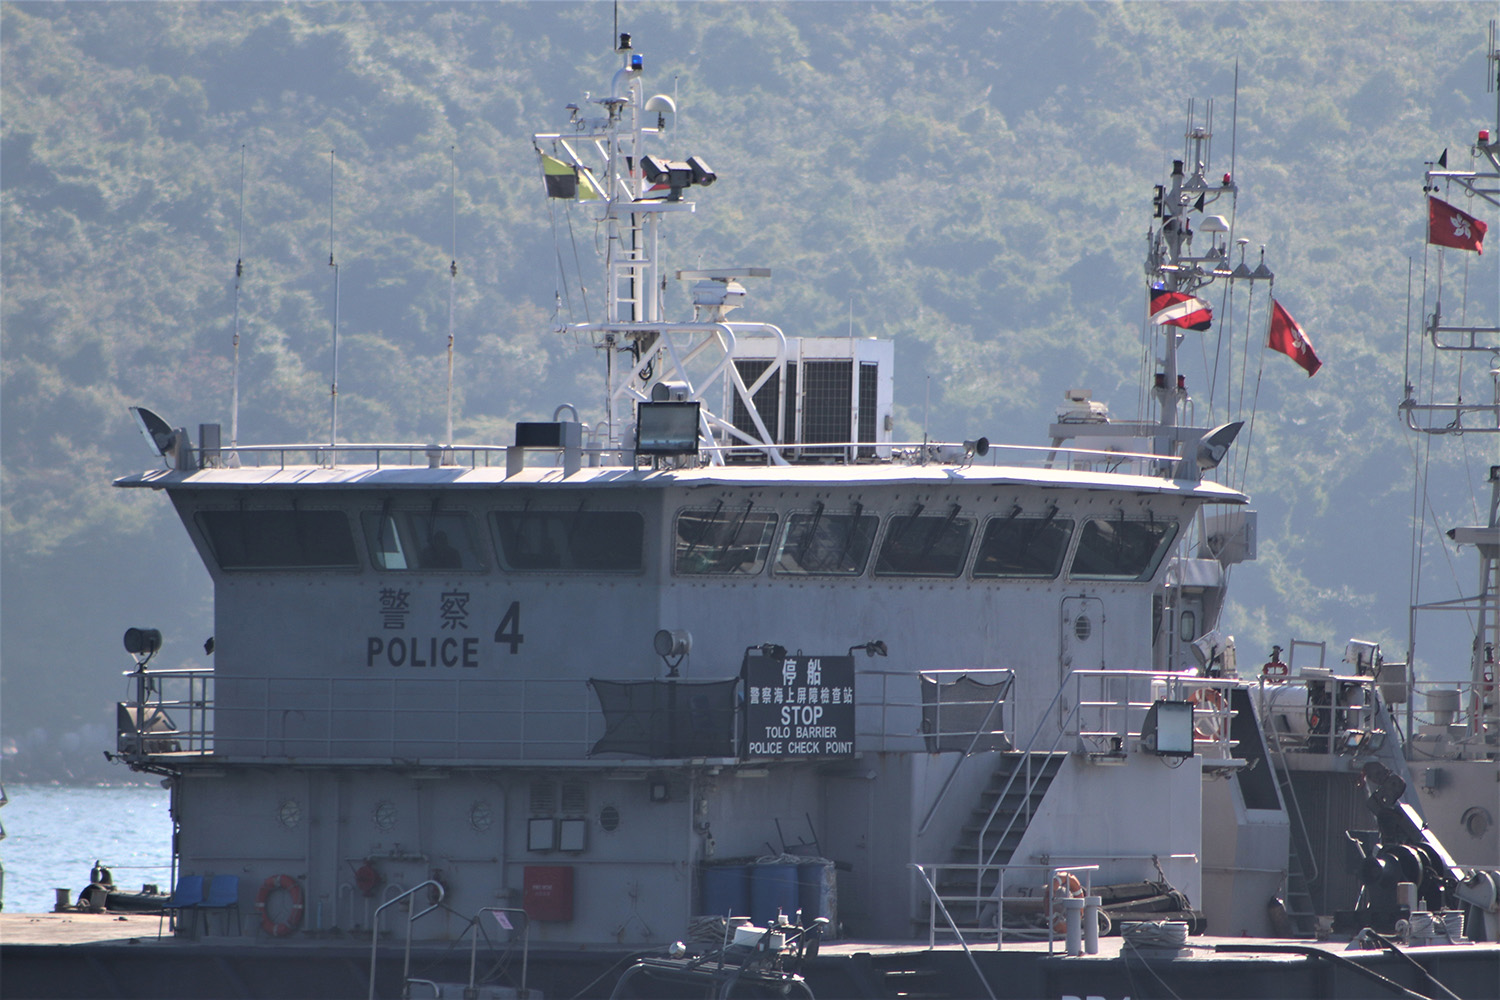 |
| Police check point at the main operating base in Tolo Channel. (Les Bird) |
 |
View of the barrier taken from Fung Wan Wat, on the northern coast of Tolo Channel. |
 |
| Tolo Channel Barrier |
Reference: 1. TNA, ADM 1/9848, Maintenance of Indicator Loop and HDA Cables (refers to letter from Admiralty of 15 June 1934).
Acknowledgement: Charles H. Bogart's excellent article " Submarine Mine Defense of Hong Kong" in The CDSG Newsletter, February 2009. The Coast Defense Study Group, Inc., PO Box 6124, Peoria, IL 61601, USA.
If you have any further details of Hong Kong antisubmarine harbour defences in general (Indicator Loops and Harbour Defence Asdic) that may help with this research project please email me at the address above.
Feedback to Dr Richard Walding: waldingr49@yahoo.com.au
Griffith University, Australia